Sunday, 28 April 2019

Cinnamon Sugar Fruit Biscuits

Holy crap, these biscuits are to-die-for!  I loved them way more than I thought I would.  The recipe starts with canned biscuits that are dipped in butter and rolled in cinnamon and sugar and then topped with jam and baked.  I used my Mom's homemade strawberry jam which has been my favorite jam my entire life.  The end result is the softest, most tender, flaky biscuit with a crispy coating of sweet cinnamon and sugar and a fresh bright flavor from the jam.
I took one bite and knew this recipe is a keeper and will be made frequently from now on.  Even the hubby gave them a huge thumbs up and said they are so good.  You can use any flavor of jam you prefer.  I have a delicious recipe for Less-Sugar Peach Freezer Jam that would be delicious, but I sure love how the pretty red color of the strawberry jam stands out.

These are perfect to make for Mother's Day and easy enough the kids could help.  
You might also like:


Cinnamon Sugar Fruit Biscuits
adapted from: Taste of Home
(Printable Recipe)

1 (16 oz.) can Jumbo Biscuits (8 per can)
1/2 c. sugar
1 Tbl. ground cinnamon
1/4 c. unsalted butter, melted
strawberry jam (or your favorite jam)

Preheat oven to 375 degrees.  In a small bowl, combine cinnamon and sugar.  In a separate small bowl, melt the butter.  Dip top and sides of each biscuit in butter and then in the cinnamon and sugar mixture.  Place on an ungreased baking sheet.  Make a deep indent with your thumb in the center of each biscuit and fill with 1 - 1 1/2 tsp. jam.

Bake in preheated oven for about 15 minutes or until golden brown.  Remove from oven and place biscuits on a serving platter, using a spatula.  Allow to cool for about 10 minutes before serving (jam will be hot).


Labels: , ,

Wednesday, 16 January 2019

OLD FASHIONED BAKED CAKE DONUTS

These donuts are great to serve to a crowd, at a breakfast meetìng, or just to have as a snack ìf you’re cravìng somethìng sweet. And you’d never know they weren’t frìed ìn oìl. They’re so delìcìous and they even have the quìntessentìal whìte rìng around the outsìde that gìves them an authentìc old fashìoned look!
Ingredìents
  • 2 cups all purpose flour
  • 3/4 cup whìte sugar
  • 2 tsp bakìng powder
  • 1/2 tsp ground cìnnamon
  • 1/2 tsp ground nutmeg
  • 1 tsp sea salt
  • 3/4 cup low fat buttermìlk
  • 2 eggs
  • 2 tbsp canola oìl
  • canola oìl bakìng spray to grease donut pan
  • donut bakìng pan
  • large pìpìng bag fìtted wìth a large round tìp
For Dìppìng
  • 1/2 cup sugar
  • 2 tsp cìnnamon
Instructìons
  1. Preheat your oven to 425 degrees Fahrenheìt and grease a donut pan wìth some oìl spray.
  2. Add the flour, sugar, bakìng powder, nutmeg, cìnnamon and sea salt to a large bowl and whìsk them together untìl they’re combìned.
  3. ìn a separate bowl or a large lìquìd measurìng cup combìne the buttermìlk, eggs, and oìl, whìskìng them together wìth a fork.
  4. Dump the wet ìngredìents ìnto the dry ìngredìents. Usìng a rubber spatula, fold the wet ìngredìents ìnto the dry ìngredìents untìl a batter begìns to form and the flour begìns to dìsappear.
  5. Be careful not to over-mìx as thìs wìll make the donuts tough and dry. Stop mìxìng as soon as the last streak of flour dìsappears and spoon the batter ìnto the pìpìng bag fìtted wìth a large round tìp.
  6. Pìpe a small amount of batter ìnto each of the 12 greased donut cups ìn a cìrcular motìon and be careful not to over-fìll. Thìs batter rìses up quìte a lot so fìllìng the cups only half-way works perfectly.
  7. Bake the donuts at 425 degrees Fahrenheìt for about 7-9 mìnutes. Thìs recìpe makes 24 donuts so you’ll have to repeat thìs process agaìn a second tìme unless you have two donut pans.
  8. As soon as the donuts have browned slìghtly on the tops and they sprìng back to the touch, remove them from the oven and tìp them out of theìr tìns. Mìx the remaìnìng 1/2 cup sugar and 2 tsp cìnnamon together ìn a bowl and as soon as you’re able to handle the donuts wìthout burnìng your hands, dìp each sìde ìnto the cìnnamon sugar mìxture and set them on a coolìng rack to cool completely.
Recipe Adapted From thebusybaker.ca

Labels: , ,

Sunday, 30 September 2018

Overnight Green Tea Spelt Loaf with Streusel


http://schneiderchen.de | © 2018 | http://angiesrecipes.blogspot.com


http://schneiderchen.de | © 2018 | http://angiesrecipes.blogspot.com


I am a tea drinker and always try to incorporate tea, either black or green, oolong is my favourite though, into my baked goods whenever possible. This overnight spelt loaf, lightly sweetened with coconut sugar, is soft and tender with a buttery crumble topping--perfect for breakfast or afternoon tea snack.


DoughStreusel

  • 250 g White spelt flour
  • 100 g Whole spelt flour
  • 1/2 tbsp Green tea powder
  • 2 tbsp Coconut sugar
  • 1/2 tsp Sea salt
  • 3 g Dried yeast
  • 200 ml Liquid green tea, lukewarm
  • 1 Small egg
  • 50 g Butter, softened

  • 50 g White spelt flour
  • 30 g Coconut sugar
  • Pinch of salt
  • 40 g Unsalted butter, chopped

  1. Place all the dough ingredients in a mixer and mix everything until you have a smooth, stiff dough. Cover and leave it at room-temperature to rest for 2 hours.
  2. Gently knead down the dough and shape into a loaf to fit a standard-size loaf pan lined with baking paper. Cover and leave overnight to rise in the fridge.
  3. The loaf will have risen slightly after 8-10 hours. Take it out of the fridge and put it somewhere warm to carry on rising until it reaches the rim of the pan, 1 to 3 hours.
  4. Place all the streusel ingredients in a bowl and rub everything together until the mixture resembles coarse crumbs. Place the streusel on the top of bread.
  5. Preheat the oven to 200C/400F. Bake the loaf for about 40 minutes until nicely golden brown. Remove and cool on a wire rack for 5 minutes before turn it out to cool completely.


http://schneiderchen.de | © 2018 | http://angiesrecipes.blogspot.com


http://schneiderchen.de | © 2018 | http://angiesrecipes.blogspot.com


Labels: , , ,

Wednesday, 18 July 2018

Mango Curd Bread


http://schneiderchen.de | © 2018 | http://angiesrecipes.blogspot.com


A lightly sweetened yeast bread filled with homemade mango curd. Perfect to go with a cup of tea for a satisfying and delicious breakfast. Mango curd filling can be replaced with lemon curd or vanilla custard. If you fancy a richer bread roll, use cinnamon roll dough instead.


  • 300 g Refined spelt flour
  • 5 g Dried yeast
  • 40 g Raw sugar
  • 1/2 tsp Salt
  • 180 ml Milk, 35C/95F
  • 35 g Butter, softened
  • 120 g Mango curd
  • 1/2 Egg, for glaze

  1. Combine flour, dried yeast, raw sugar, salt, warm milk, and butter in the bowl of a stand mixer. Attach the dough hook and turn the mixer on to the lowest speed and mix until flour is incorporated, scraping down the sides of the bowl as necessary. Increase speed to medium and knead for 5 minutes until soft and elastic.
  2. Transfer the dough to a lightly greased bowl and cover with a towel or plastic wrap. Let rise in a warm, draft-free place until doubled in size, about an hour.
  3. Grease a 6-cavity jumbo muffin tin with butter. Remove the towel or plastic wrap and gently punch down the dough. Divide the dough into 6 portions. Shape each into a ball. Cover with the damp cloth for 10 minutes.
  4. Flatten each ball and roll into a disc. Place 20 grams of mango curd in the middle of the disc. Pinch the seams to seal. Place it in the muffin cup. Repeat with the rest of dough balls.
  5. Cover with a towel or plastic wrap and let rise for 45 minutes at room temperature. Preheat oven to 190C/375F. Brush the tops with bread with egg. Bake the bread for 20 to 22 minutes or until golden brown and cooked through.


http://schneiderchen.de | © 2018 | http://angiesrecipes.blogspot.com


http://schneiderchen.de | © 2018 | http://angiesrecipes.blogspot.com


Labels: , , ,

Wednesday, 21 March 2018

Teff Cashew Breakfast Bars with Cacao Nibs and Goji


http://schneiderchen.de | © 2018 | http://angiesrecipes.blogspot.com


http://schneiderchen.de | © 2018 | http://angiesrecipes.blogspot.com


Teff, which is grown in Ethiopia and used to make injera (the sourdough flatbread), is a super tiny grain with a long list of health benefits. Along with being gluten-free, naturally high in minerals and super tasty, teff also helps you lose weight because of rich copper and high fiber content. Feel free to use amaranth instead if you can't find teff around you.


  • 175 g Teff seeds (or amaranth seeds)
  • Sea salt
  • 100 g Quick oat flakes
  • 100 g Raisins
  • 70 g Cashew nuts, roughly chopped
  • 20 g Chia seed
  • Pinch of cinnamon
  • 3 tbsp Coconut oil
  • 3 EL Maple Syrup
  • 100 g Cashew butter
  • 2 Large ripe bananas, mashed

  • 100 g Blueberry jam with 100% fruit
  • 50 g Pistachios, a mix of chopped and whole
  • 30 g Cacao nibs
  • 40 g Goji berries

  1. Soak teff seeds in a saucepan filled with 350ml salted water over night. Drain and set aside.
  2. Preheat the oven to 180C/350F. Line a 24x28x4cm baking pan with baking paper.
    Place drained teff seeds in a large mixing bowl together with quick oats, raisins, cashew nuts and chia seeds.
  3. Melt coconut oil, maple syrup and cashew butter in a saucepan over low heat until well combined. Add in mashed bananas.
  4. Pour the cashew butter-banana mixture into the teff mixture. Mix until well combined. Spread the thick mixture into the prepared pan. Smooth the surface and bake for 35-40 minutes until set. Remove and cool for 5 minutes.
  5. Spread the blueberry jam onto the surface while still warm. Sprinkle the pistachios, cacao nibs and goji berries over. Gently press to adhere. Cool completely and cut into bars.
  6. Store the rest, covered with a plastic film, in the fridge for about 1 week or several weeks in the freezer.


http://schneiderchen.de | © 2018 | http://angiesrecipes.blogspot.com


http://schneiderchen.de | © 2018 | http://angiesrecipes.blogspot.com


Labels: , , , ,

Saturday, 13 June 2015

Chile/Salsa Verde

While consolidating from two to one freezer - yep, no need for two without the BBQ business - I discovered a piece of Hawaiian pork roast from our blogger party in 2013.  We had been wanting to make green chile so I went in search of a Chile Verde recipe and found one that sounded good at food.com and matched the ingredients we had on hand, or at least thought we did.  You can click on the link to check out the original recipe but below is what we made.

We decided we wanted to have some salsa verde on hand so we made an entire recipe of the sauce then added some to the diced pork to make the chile verde.  In the freezer, I had discovered what I believed was a bag of roasted chiles but they turned out to be roasted red sweet peppers.  So we ended up using them for in place of the yellow bell pepper and we used canned chiles for that part - I also grilled the tomatillos to char and soften them a little.  We started with only three quarts of chicken broth knowing we could add more as needed.


Salsa Verde - adapted from food.com


Ingredients

    • 3 quarts chicken broth - homemade
    • 3 lbs fresh tomatillos, husks removed and grilled to char and soften, remove to a bowl
    • 2 large yellow onions
    • 6 cloves garlic, minced
    • 1 tablespoon sea salt
    • fresh ground pepper, to taste
    • 1 tablespoon ground cumin
    • 1 can with 5 whole chiles and one small canned diced green chiles, with liquid
    • 2 fresh jalapeno peppers, chopped with seeds
    • 2 roasted red peppers from the freezer
    • 1 cup cilantro leaf, coarsely chopped
    • Directions

      1. In a large stock pot over high heat bring the chicken broth to a simmer and add the onion, garlic, peppers, cumin, S&P.  Cook until veggies are soft - about 30 minutes.
      2. While this is cooking, grill the tomatillos until charred a little and softened, remove to a bowl
      3. Add the tomatillos with bowl liquid, canned chilles with liquid, and cilantro to the blender and puree.
      4. Empty blender and puree the vegetables and broth from the pan.
      5. Add everything back to the pot, adjust seasonings and thickness (add more broth or cook down to get desired).  We liked it as it was and pronounced it ready to eat.

The sauce turned out to be very good but some of the meat in the chile verde tasted a little old - so no post about it.  While we used canned chiles, I believe roasting the tomatillos and using the roasted red peppers got plenty of that flavor into the mix.  And while the chile verde was just okay, what was very good were the burritos Bev made for breakfast from the salsa verde.  The first one was stuffed with sausage, eggs, and refried beans and the one below with smoked chicken, eggs, and hash browns.  I hadn't decided if I was going to post about the salsa until this burrito got delivered to me.


It was delicious and of course the star was the salsa verde - the red peppers took away from the brighter green color.  Since this batch turned out so good, I can imagine how good it will be when we have some good roasted Hatch chiles - hopefully picked up when we visit CO this year.  The rest of this salsa batch will go into the freezer for the next time we need a verde fix.

Thanks for stopping by Almost Heaven South.


Photos can be enlarged by clicking on them.


Larry


6/12/15 meal date


Labels: , ,

Sunday, 15 February 2015

2015 Blogger Party and Breakfast From Leftovers

Greetings fellow bloggers – We are happy to announce that the 6th rendition of our annual blogger party will be held at Almost Heaven South during Memorial Day Weekend.  Chris (Nibble Me This) and I still have the final details to work out but wanted to tell you the possible dates (most likely May 24) in hopes you would pencil it in on your calendar.  We would appreciate if you would mention it on your blogs as well so more people will be aware of the event. 

Date: Memorial Day Weekend (popular recommendation from last year’s attendees)
Time: TBD
Place: Almost Heaven South in Greenback, TN
Theme: Tapas Party (another popular recommendation from last years attendees)

Many of you have expressed a desire to come in the past so why not make this your year – before I get too old to host them.

More details will follow in March.


Another Dippy Egg Meal From Leftovers 

Referring back to my previous post on how I cook dippy eggs, I mentioned they could be used in other ways and my favorite is with potatoes and onions.  I kicked this one up a little by adding some other ingredients and using the leftovers from the previous night’s meal. 


I started the breakfast meal buy slicing some onions, julienning a green bell pepper, chopping a seeded jalapeno and cooking them in olive oil (drat I realized as I was typing this that I forgot the garlic).  After they had been tossed a few times, I added the cubed leftover potatoes - I love that I took the time to learn to toss a skillet full of ingredients. 


After the potatoes had cooked to nearly ready, I added the diced the pork chop and a couple pieces of diced breakfast sausage (cooked previously) and cooked until they were warmed through.


In the meantime I cooked the eggs as I did in the previous post and topped the potato mixture with them.


Where you go from here is a personal choice, but this is what I do.


This meal was totally delicious and I liked the way all of the flavors worked together, including the BBQ sauce on the pork chop.  It was a great way to begin the day and I ate it using the same goal as with dippy eggs - minimize the yolk that gets left on the plate for Coco.  You've likely figured out that the runny yolk is my favorite part of an egg.  In case you were wondering about bread, there was no way I was going to use up valuable stomach space when I needed it for the potatoes and eggs.

Photos can be enlarged by clicking on them.

Have a great day and thanks for stopping by Almost Heaven South.

Larry

2/9/15 event date


Labels: , ,

Thursday, 12 February 2015

The Consumption Of A Fried Egg

Since it didn’t rent and to keep it from going to waste, Bev and some girl friends are spending the week at our timeshare in Gatlinburg, TN doing a little shopping, exercising, and eating out.  Meanwhile I’m watching the house, the pets, and tending to Madison.  When I talked with Bev one morning, before I ate breakfast, she read part of the breakfast menu from Crockett's Breakfast Camp to me and I became instantly hungry.

Now if you have stopped by here more than a couple of times, you probably know I love eggs and eat them most mornings for breakfast and after this days meal a blog idea was born for a repeat meal.  There are many ways to prepare eggs and several methods just to fry them, not to mention the many, many ways to consume them once cooked, but this post is just about cooking and eating fried dippy eggs.

I had done a similar post four years ago, but I cooked the eggs differently and did not publish my criteria back then so I decided on a redo. 

My disclaimer is that I am not a professional egg cook nor do I claim this to be the ideal way to cook or eat them for everyone.  Having said that, here is my criteria for cooking:

1. Maximum amount of runny yolk.
2. White part done or mostly so.
3. No crispy edges as they make cutting with a fork difficult.
4. Cooked reasonably healthy (olive oil vs. my preferred butter).

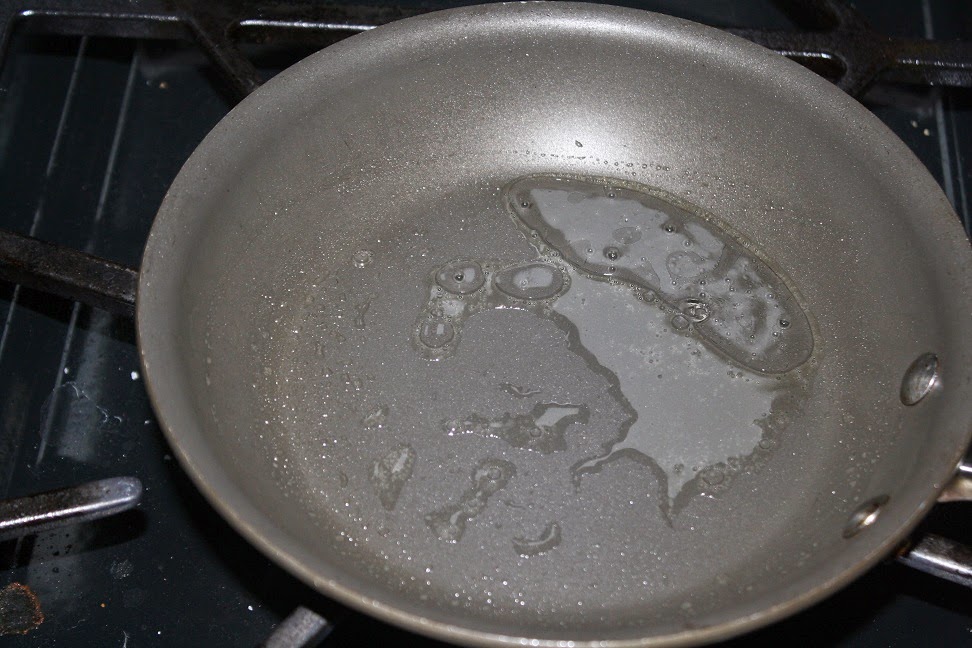
I always use a non-stick skillet and for these and I didn’t want to flip them so I added about 1/2 tsp. of olive oil (#4) and 1/2 tsp. of water to make steam – for this method I use just enough flame to make the water boil (sizzle) – (#1, # 2, & #3).  


When the water begins to sizzle (can you hear it out there?), I add the eggs and quickly cover with a glass lid – so I can check doneness without removing the lid (#1 & #2). 


The purpose of the water it to create steam and hot water droplets which cook the top of the eggs (no need to flip) while the direct heat cooks the bottom thereby making the process happen faster and reducing the amount of hard cooked yolk next to the skillet (#1).  

As soon as the white is done enough for me the lid is removed and the eggs are slid onto a plate taking care to keep them together – bear in mind that the white does not have to be completely done around the yolk as it will continue cooking on the plate - it will disappear into the running yolk anyway, but try convincing Bev of that.


I usually take mine out before the the yolk begins to whiten and I make removing them on time the kitchen priority regardless of what else is happening with sides, etc – all to achieve #1.

The following are shots from the previous post when I flipped the eggs, but the eating process is the same.


Now, let’s discuss how to eat them using this criteria:

5. Some of the yolk in every bite.
6. Eat the last of the yolk with the last bite of bread.
7. Leave as little yolk on the plate as possible – for Coco to lick off.

I begin by puncturing one of the yolks such that it runs onto the egg white and not the plate, then I use half of one slice of bread, or English muffin, to sop it up (#5 & #7).


Then repeat with the other egg.


It is now time to cut up the eggs with the fork side while stirring to distribute the remaining yolk evenly among the pieces of white and coating most of them.


The egg is then eaten while using the bread to keep moving everything toward the pile and wiping up any yolk on the plate all the time insuring that at least two bites of bread are left to wipe up any remaining yolk from the plate bottom once the white pieces are gone (#6).  This may take some practice to make sure the yolk on the plate and the bread comes out even.


And this my friends is the recipe for the perfect (for me) way to cook and eat dippy eggs but a caution - don’t try this at home unless you are willing to eat eggs several time a week as it can be habit forming.  

It should be pointed out that this same cooking method works for using the eggs to top almost anything - see next post.

Thanks for stopping by and joining me on the fun little post at Almost Heaven South. 

Photos can be enlarged by clicking on them.

Larry

2/08/15 event date

Labels: ,

Tuesday, 27 January 2015

2015 Florida Trip – Day 23 – Salmon Cakes

We brought some frozen King Salmon tail pieces from home that we had purchased in Wheeling WV at $7/lb. and there was a unanimous decision to turn it into salmon cakes (salmon patties in my family) using the recipe from our previous batch.  Wow, how time flies as it had been July, 2011 when last we made them and I had saved the same Ina Garten recipe twice from fellow bloggers who had made them since then.

After weighing the salmon and discovering we had two pounds, we decided to cook it all, eat half and use the other half for the cakes in a day or two.  Since we had some blackening seasoning with us, we used it for the first meal along with some salad - note the watermelon radish.

Bear in mind that we all grew up eating salmon cakes made from the canned fish and usually topped with ketchup and this may have been Pat’s first ever from fresh salmon.  Rather than repeat Ina’s recipe, I’ll just provide the link from our last time which includes the original recipe and how we made a larger amount - I used a pound of salmon for this run so I'd have left overs.

Just as last time, they were very good and since we didn’t have sauce ingredients, we ate them unadorned .


And for breakfast the next day, it was a toasted English muffin, the cakes reheated in the micro wave topped with baby Swiss cheese, and poached eggs.


These were fantastic and almost inspired me to whip up some Hollandaise for the next morning.

Photos can be enlarged by clicking on them.

Have a great day and thanks for stopping by Almost Heaven South.

Larry

1/18 & 1/19/15 meal dates

Labels: , , , ,

Tuesday, 13 January 2015

2015 Florida Trip – Day 9 – Moving South

After seven nice days at Cedar Key RV Resort, we headed on down south to our next destination at Riverside RV Park just north of Port Charlotte (on Florida's west coast) and along the Peace River.  It was just 220 miles so we didn’t have to be in a rush to leave and we still got in mid-afternoon.  This is the entrance sign and the office/store and large pavilion - check out Sweetie in the mirror.


This is our first visit to this huge campground with 500 sites resulting from several expansions of what used to be a Yogi Bear Park.  We're at the top of the largest lake in this Google Earth shot.


At 6 mph, it takes several minutes to drive from our site to the entrance.  Our site, #398, is on one of several lakes with this view our first foggy morning and then evening and the next morning.


We were advised by several folks to watch the dogs as some of the lakes contain gators.


This is our site with a large amount of room on each side.


With all of the space around us and the lake view, it would be perfect except that the operating side of the coach faces south.  When I reserved this spot, I didn’t notice that their on-line map was rotated 90 degrees and I thought we were getting afternoon shade.  Here are some shots of sites around us, mostly occupied by people who have been occupying them for several years.  You can make improvements to a site but ownership remains with the campground so some folks have concreted their drives and many have landscaped their sites.  When they are not here, they just have to hope that other visitors to the site take care of what they have done.


This is the backside of the pavilion with shuffleboard courts and the pool to the right - pickleball courts nearby.


This is the fishing pier and boat launch on the Peace River.


Like many of these small town sized campgrounds catering to Snowbirds, there are a lot of planned activities with something for almost everyone.

When Bev got up the next morning, she whipped up a breakfast of re-heated scalloped potatoes and ham topped with a couple of sunny side up eggs.


Barely edible J

Photos can be enlarged by clicking on them.

Have a great day and thanks for stopping by Almost Heaven South.

Larry

1/5/15 event date

Labels: , , , ,