Wednesday 31 October 2018

Stirfried Brussels Sprouts with Beluga Lentils


http://schneiderchen.de | © 2018 | http://angiesrecipes.blogspot.com


Brussels sprouts flourish this time of year. Put this hearty winter veggie and beluga lentils together in this delicious and nutritious vegetarian meal tossed with a simple balsamic vinegar dressing.


  • 180 g Beluga lentils
  • 400 ml Water
  • 500 g Brussels sprouts, trimmed and washed
  • Salt
  • 50 g Sundried tomatoes, sliced
  • 1 Shallot, diced
  • 3 tbsp Ghee
  • 20 g Raisins
  • 50 ml Organic apple juice
  • 50 ml Chicken broth
  • 1 tbsp Maple syrup
  • 2 tbsp Balsamic vinegar
  • Freshly ground peppers
  • Parsley leaves


  1. Cover the lentils with water in a medium pot. Cook, covered, for 20 minutes until tender. At the meantime, bring a large pot of water to boil. Add salt to taste and brussels sprouts. Cook for 10 minutes. Drain and set aside.
  2. Slice the sundried tomatoes and finely dice the shallot. Melt the ghee in a skillet. Add in diced shallot and stir until aromatic. Add in brussels sprouts and cook for 3 minutes. Now add in sliced tomatoes and raisins and cook 3 more minutes.
  3. Pour in apple juice and chicken broth and cook 3 more minutes. Fold in lentils, season with maple syrup, balsamic vinegar, salt and pepper. Toss gently to combine. Garnish with parsley and serve.


http://schneiderchen.de | © 2018 | http://angiesrecipes.blogspot.com


http://schneiderchen.de | © 2018 | http://angiesrecipes.blogspot.com


Labels: , , ,

Tuesday 23 October 2018

Health Food Raisin Bread


Health Food Raisin Bread (Source: Maida Heatter's Cakes (Andrews & McMeel Publishing, 2011 ed., pg. 264).

I love to have a sweet bread or cake with my morning coffee but I have been trying to limit my sugar intake. That is hard to do with Maida Heatter's recipes but this one recently caught my eye. There is no sugar in it and it is sweetened with honey and molasses. I really like it, especially with cream cheese. She has some similar recipes of this nature that I plan to try soon. 


I do not normally use that much whole wheat flour so I store it in our old refrigerator in the garage. I used Bob's Red Mill stone ground wheat flour for this. Wheat germ is another item I store in the refrigerator. I did not toast this for the recipe but the next time I will try doing that. For the molasses, I happened to have some Brer Rabbit molasses in the cabinet that I used earlier in the year for another recipe.


A 6-cup capacity loaf pan is needed for the recipe. I had a long, narrow pan (measuring about 12" x 4.5") stored away that I just started using and I love it. It bakes faster than wider pans so keep in mind that pan size can affect baking times. This recipes specifies 50 minutes but mine was done in 40.

This is a fast and easy to make! I did not even use a mixer for this.


2 cups unsifted all-purpose whole wheat flour

1/4 cup unsifted all-purpose white flour
3/4 tsp. salt
1 tsp. baking soda
1 1/4 cups (6 oz.) raisins (dark or light)
1/4 cup wheat germ, untoasted or toasted
1/2 cup milk
1 cup buttermilk
1/4 cup honey
1/4 cup dark or light molasses

Preheat the oven to 350. Butter a 6-cup capacity loaf pan and dust it with wheat germ (you can use toasted wheat germ as well).

Place both whole wheat and all-purpose flour in a mixing bowl and whisk together. Add the baking powder through a fine strainer.


Stir in the raisins, being sure to separate them and make sure they are all floured.


Stir in the wheat germ.


Mix together the milk, buttermilk, honey and molasses.


Add the milk mixture to the batter and mix well with a wooden spoon.


Place the batter into the pan, smooth the top and form a slight trench down the middle of the top with a spoon. 


Bake for 40 - 50 minutes until the top feels semi-firm and a tester comes out clean. Cool in the pan for at least 15 minutes before turning out and allowing to cool completely on a wire rack.

After cooling, wrap the bread well. It dries out quickly.


Labels:

Monday 22 October 2018

Jujube Spelt Streusel Bars


http://schneiderchen.de | © 2018 | http://angiesrecipes.blogspot.com


http://schneiderchen.de | © 2018 | http://angiesrecipes.blogspot.com


Jujube, or Chinese date, is a hoarder of nutrients. Like dates, jujube fruit is loaded with energy, essential vitamins and minerals (magnesium, potassium, copper, niacin, calcium, manganese, phosphorus, and iron), which provide its many health benefits. These erythritol sweetened cookie bars with a Quark cheese & butter crust and a streusel topping are packed full of fibre and wonderful as a breakfast cookie or a healthy after school treat.


Jujube SpreadStreuselCrust

  • 300 g Jujube dates, red or black
  • 70 g Erythritol
  • 50 g Butter

  • 100 g White spelt flour
  • 50 g Erythritol
  • Pinch of salt
  • 80 g Unsalted butter, chopped
  • 1/2 tsp Vanilla extract

  • 100 g White spelt flour
  • 70 g Whole spelt flour
  • 50 g + 20 g Hazelnut meal
  • 50 g Erythritol
  • 1 tsp Baking powder
  • 150 g 20% Quark
  • 1 Large egg
  • 50 g Butter, chopped and softened


  1. Cover jujube dates with water and let soak for 1 hour. Using a paring knife, slice down lengthwise into the date. Pull open the date and remove the pit. Place them in a medium pot and fill with enough water. Cover the pot, bring to a boil and simmer for 25 minutes. Use an immersion blender and blend the jujubes until smooth.
  2. Cook the mixture over low-medium heat until it has thickened, about 1 hour. Stir in butter and mix well. Set aside to cool.
  3. Place spelt, erythritol and salt for the streusel together in a mixing bowl. Add in chopped butter and vanilla extract. Rub everything together until the mixture resembles coarse crumbs.
  4. Place all the ingredients for the crust, except 20 grams of hazelnut meal, in a mixing bowl. Beat with a handheld mixer until a smooth dough forms. Press the dough evenly into a 22x26x4cm baking pan lined with parchment paper. Sprinkle the reserved hazelnut meal over. Spread the jujube spread over. Top with prepared streusel.
  5. Preheat the oven to 180C/350F. Bake the bar in the middle of hot oven for 35-40 minutes until nicely golden. Remove and cool completely before slicing into bars.


http://schneiderchen.de | © 2018 | http://angiesrecipes.blogspot.com


http://schneiderchen.de | © 2018 | http://angiesrecipes.blogspot.com


http://schneiderchen.de | © 2018 | http://angiesrecipes.blogspot.com


Labels: , , , ,

Ghostly Donuts


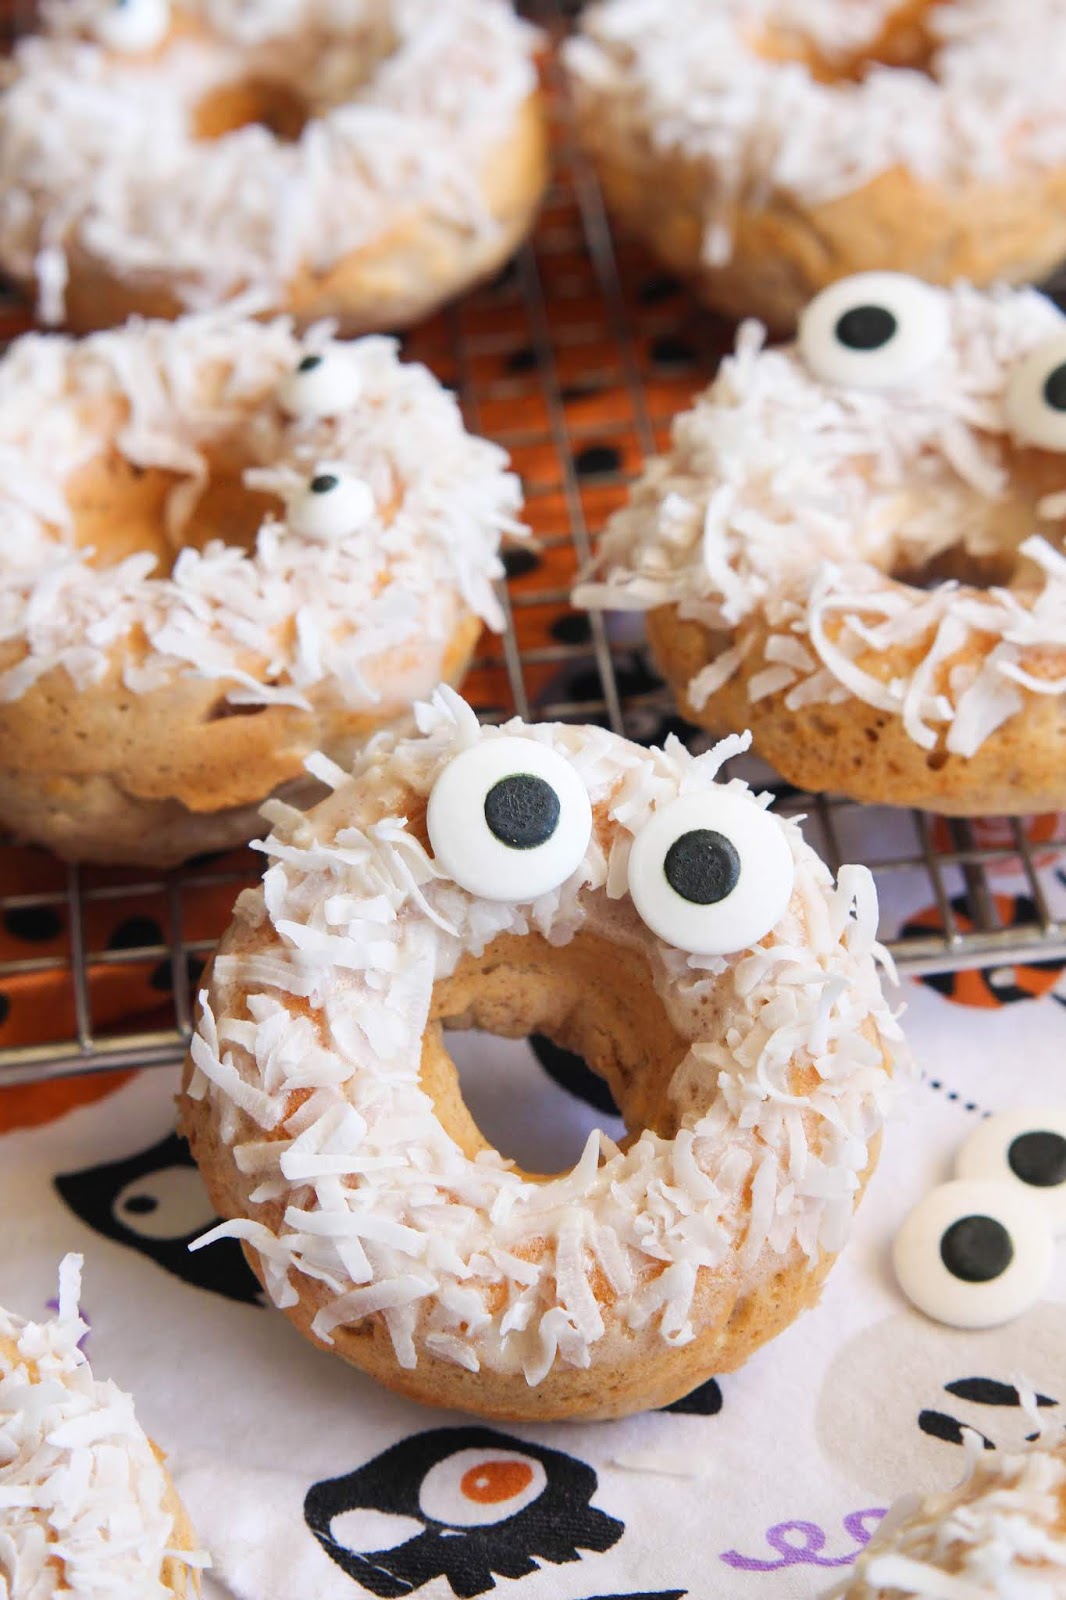
It's almost Halloween and I can't wait.  Halloween is one of my absolute favorite holidays.  I have so many fun "Halloween-themed" recipes saved and I don't get around to making many of them, but this Ghostly Donut recipe is so stinking simple that I couldn't resist.  These donuts have an ingredient in them that I have never used before, so I was eager to see what I thought.

This post is sponsored by In the Raw.  However, all opinions expressed herein are my own and do not reflect the opinions of the makers of In the Raw sweeteners.  In the Raw provided me with product samples, a gift card and the below information about Monk Fruit In The Raw.   
Have you ever heard of Monk Fruit In The Raw? 

 Let me give you a few facts about it:
- Monk Fruit In The Raw is a zero calorie sweetener that is certified vegan and naturally gluten-free

- Monk Fruit In The Raw is made from vine-ripened monk fruit, native to Southeast Asia

- It adds deliciously light sweetness to any baked good or beverage, and is available in packets and a Bakers Bag

- Monk Fruit In The Raw is ideal for those looking to cut added sugars and is also recommended to those with or at risk for diabetes seeking sugar substitutes
This is the first recipe I have ever made using any kind of sugar substitute.  Honestly, I had low expectations, but I was impressed by how delicious these donuts are.  The texture and flavor are great.  The cinnamon really adds a great flavor and I highly recommend not leaving that out.  The donuts are soft with a little bit of chewiness to them.  

I was a little nervous about the glaze, because when tasting it on it's own, it was a little different than what I'm used to with regular powdered sugar based glaze.  BUT, once the donuts are all put together with the glaze and unsweetened coconut, they were really good.  I ate two donuts right away :)

I can't wait to test out other recipes using Monk Fruit In The Raw.  

For more information about In The Raw products, check out the below links:


Ghostly Donuts

2 c. all-purpose flour
2 tsp. baking powder
1 tsp. ground cinnamon
1/2 tsp. salt
1/3 c. Monk Fruit In The Raw
3/4 c. 2% milk
5 Tbl. unsalted butter, melted and slightly cooled
2 large eggs
1/2 tsp. vanilla extract

Glaze
1 c. Monk Fruit In The Raw
1 Tbl. cornstarch
3 Tbl. 2% milk
1/4 tsp. vanilla extract
1 c. shredded unsweetened coconut
48 googly eye candies or mini chocolate chips

Preheat oven to 350 degrees. Spray a donut pan with cooking spray; set aside.  In a medium bowl, whisk together the flour, baking powder, cinnamon, salt and Monk Fruit In The Raw.  In a second medium bowl, whisk together the eggs and melted butter, then whisk in the milk and vanilla. Pour wet ingredients into dry and stir together just until combined.  Divide batter between the depressions in the donut pan and bake for 15 minutes, or until golden and top springs back when lightly touched.  Cool in pan for a few minutes, then use a toothpick to loosen from pan and transfer to wire rack to cool completely.

For the glaze: In a small bowl, whisk together Monk Fruit In The Raw, cornstarch, milk and vanilla.  Place coconut in a separate bowl or plate.  Dip one side of each donut into the glaze and then in the coconut.  Place two googly eyes or chocolate chips onto each donut and allow to dry on a rack.  Makes 12 donuts.  

Labels:

Wednesday 17 October 2018

Peanut Butter M&M Cookie Bars

These cookie bars are SOOOO good.  This recipe is my go-to cookie bar recipe that I use all of the time, but I switched things up this time and added Peanut Butter M&M's. 

I think this might have been the first time I have bought Peanut Butter M&M's and it definitely won't be the last. They made these cookie bars outstanding.  The cookie is soft and chewy and then when you bite into the M&M's with the crisp outer shell and creamy peanut butter filling, you will be in heaven.  These come together super fast and taste great for several days.

You might also like:


Peanut Butter M&M Cookie Bars
From: Jenn@eatcakefordinner

3/4 c. unsalted butter, room temperature
2 c. packed light brown sugar
3 large eggs
2 tsp. vanilla extract
3 1/2 c. all-purpose flour
1 Tbl. baking powder
1/2 tsp. salt
1 (18.4oz.) bag Peanut Butter M&M's

Preheat oven to 350 degrees.  Cream together the butter and brown sugar.  Add the eggs, one at a time, beating after each addition.  Add the vanilla and mix until combined.  Add the flour, baking powder and salt and mix until just combined.  Stir in the Peanut Butter M&M's.  Press dough into a greased 9x13-inch cake pan.  Bake for 20 minutes.  Cool, cut into bars and serve.  

Labels: , ,

Monday 15 October 2018

Einkorn Vanilla Protein Pumpkin Bread With Port Soaked Raisins


http://schneiderchen.de | © 2018 | http://angiesrecipes.blogspot.com


A delicious, nutritionally packed quick einkorn bread filled with my Autumn favourites - pumpkin and warm spices. It makes a perfect low sugar snack or breakfast with plenty of protein. You can swap the protein flavour and feel free to use other types of whole grain flour instead of einkorn.


  • 50 g Vanilla whey protein powder
  • 50 g Almond meal
  • 150 g Einkorn berries, milled into flour
  • 2 tsp Baking powder
  • 1/2 tsp Baking soda
  • 1 tbsp Pumpkin pie spice mix

  • 300 g Pumpkin puree
  • 50 g Lemon curd
  • 1 Large egg
  • 2 tbsp Coconut syrup
  • 50 g Ghee, melted
  • 180 g Raisins, soaked in port wine and drained
  • 1 tbsp Coconut flakes for topping


  1. Line a standard-size loaf pan with baking paper. Preheat the oven to 190C/375F.
  2. In a large mixing bowl, whisk together the protein powder, almond meal, milled einkorn, baking powder, baking soda and spice mix.
  3. Beat pumpkin puree, lemon curd, egg, coconut syrup, and melted ghee in another bowl until smooth and well combined.
  4. Sift in the flour mixture and fold to combine. Fold in drained raisins. Scrape the batter into the prepared loaf pan. Smooth the surface and sprinkle the coconut flakes over.
  5. Bake in the hot oven for 30 minutes. Reduce the oven temperature to 170C/340F and bake 15 more minutes until nicely golden brown and a wooden toothpick, inserted in the middle comes out clean. Remove and cool in the pan for 5 minutes before turning out onto a wire rack to cool completely.


http://schneiderchen.de | © 2018 | http://angiesrecipes.blogspot.com


http://schneiderchen.de | © 2018 | http://angiesrecipes.blogspot.com


Labels: , , , ,

Monday 8 October 2018

Easy Ground Beef Lo Mein {In under 30 minutes}


I can't even tell you how many times I have made this.  My whole family loves it.  It comes together super fast and it tastes great leftover.  This has really become a go-to recipe.  After the first bite, I knew it would become a regular menu item.
I adapted it from this recipe, but since we don't really eat much steak, I went with hamburger and I also doubled most of the sauce recipe.

Seriously, the flavor of this dish is outstanding and it even tastes great leftover.  Have dinner on the table in no time with this simple and delicious recipe.  
You might also like:


Easy Ground Beef Lo Mein
Slightly adapted from: The Recipe Critic
(Printable Recipe)

8 oz. spaghetti noodles
3 c. fresh broccoli florets
1 Lb. lean ground beef
1 Tbl. dried onion flakes
2 garlic cloves, minced
1- 1 1/2 c. shredded carrots (I buy the pre-shredded/matchstix)

For the sauce:
1/2 c. light brown sugar
1/2 c. reduced-sodium soy sauce
1/4 c. hoisin sauce
2 tsp. sesame oil
1/2 tsp. ground ginger
1/4 tsp. crushed red pepper flakes

In a large pot of boiling water, boil the spaghetti noodles according to package directions.  About 5 minutes before the noodles are done, add the broccoli florets to the boiling water.  Drain when done.  Meanwhile, brown the ground beef in a large skillet over medium-high heat.  When meat is just about browned all the way through, add in the dried onion flakes, minced garlic and shredded carrots and cook until meat is cooked through and carrots are tender, stirring frequently. Add in the cooked spaghetti noodles and broccoli and then pour in the sauce.  Toss to coat everything in sauce and cook for 1-2 minutes until sauce is heated through.  Serve.

For the Sauce:
Whisk together brown sugar, soy sauce, hoisin sauce, sesame oil, ground ginger and red pepper flakes.   

Labels: , , ,

Keto Hazelnut Chocolate Chip Cookies


http://schneiderchen.de | © 2018 | http://angiesrecipes.blogspot.com


Rich, delicate, moist and chewy - - these easy low carbs, gluten free hazelnut chocolate cookies are perfect for grab-and-go and an ideal treat for cookie fans on low carbs or anyone who follows keto diet. If you want to make them paleo friendly, just replace psyllium husk powder with arrowroot powder. Also almonds or macadamias can be used in the place of hazelnuts.


  • 200 g Hazelnut meal
  • 10 g Psyllium husk powder
  • 10 g Arrowroot powder
  • 120 g Erythritol
  • 1 tsp Baking powder
  • 100 g Salted butter, chopped and melted
  • 1 Egg, medium
  • 1 tsp Vanilla extract
  • 150 g No-sugar added chocolate chips


  1. Preheat oven to 180C/350F. Prepare a large baking tray lined with parchment paper.
  2. Place chopped butter in a microwave-safe dish. Microwave, uncovered, on high until butter is melted, about 30 seconds. Take out and cool slightly.
  3. Place the hazelnut meal, psyllium husk powder, arrowroot powder, erythritol and baking powder in a large bowl and mix to combine. Add in melted butter, egg and vanilla and mix well to combine. Stir through the chocolate chips.
  4. Roll 2 tablespoonfuls of dough into a ball. Place the cookie balls on the prepared baking tray, leaving 5cm between each to allow room for spreading. You will have 12 cookie balls.
  5. Bake for 10–12 minutes or until golden brown. Allow to cool slightly on trays before transferring to wire racks to cool completely.


http://schneiderchen.de | © 2018 | http://angiesrecipes.blogspot.com


http://schneiderchen.de | © 2018 | http://angiesrecipes.blogspot.com


Labels: , , ,

Wednesday 3 October 2018

Chocolate Fondant Cookies


Chocolate Fondant Cookies
Source: Maida Heatter's Brand-New Book of Great Cookies (Random House, 1995 ed.), pg. 138.

Maida describes these cookies as "plain" and that they are but in my opinion, the addition of chocolate brings anything up to another level! Especially milk chocolate (I used Hershey bars). The batter was sinfully delicious and I could have stood there and ate the entire bowl. The cookies are good, nothing extraordinary, but you find yourself going back for more...


7 TBS. unsalted butter
3/4 cup sifted unbleached flour
1 tsp. baking powder
Pinch of salt
1/3 cup unsweetened cocoa powder
1/3 cup sugar
7 oz. milk chocolate
2 large eggs
Optional: Confectioners sugar (to sprinkle on top of cookies)

Preheat oven to 350. Line cookie sheets with parchment paper or foil.

Cut the butter into small pieces and set aside.

In a food processor, add the flour, baking powder, salt, cocoa and sugar and pulse a few times to mix. Break the chocolate into small pieces and mix for about 20 seconds. Add the butter and process for 15-20 seconds until the mixture holds together. With the processor running, add the eggs through the feed tube and mix well. Transfer mixture to a small bowl.

Form the dough into tablespoon sized balls. Place them on a piece of foil a few inches apart. You will have to wet your hands throughout the process so it is good to do this next to the sink. 
Place the formed balls on the prepared cookie sheet about 3 inches apart. Bake for 12-15 minutes. The dough will barely spring back when pressed when they are ready. Do not overbake.
The cookies will expand a bit during baking. Transfer them to a wire rack with a wide spatula. Let them cool completely before storing in an airtight container. 

Labels: